Job Management Job Invoicing Hold Back Invoicing
Creating a Hold Back Invoice during Job Closing (continued)
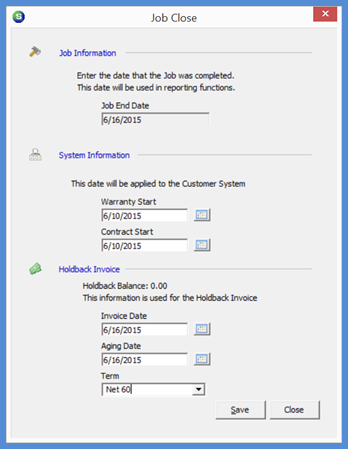
4. The Job Close form will be displayed. Enter the Job End Date, Warranty Start Date and Contract Start Date according to your company policies and procedures.
In the Holdback Invoice section there are three field that must be populated. When finished entering the information click the Save button located at the lower right of the form; the Job is now closed and the Hold Back Invoice has been posted.
Invoice Date - Enter the date for the Hold Back Invoice. This date must be in an open accounting period
Aging Date - The date on which the invoice will begin to age. Many contractors will not accept a hold back invoice until 30 days from the completion of the Job. You may enter a future date in this field and enter a terms code in the next field such as Net 30. This way the invoice may be submitted now to the customer, or held and mailed at a future date.
Term - Select the Term Code for the invoice.
Note: When creating the Hold Back invoice through the Job Closing process, you do not have the option of selecting an Invoice Description or typing in a Memo. Once the Invoice has been posted, you may open the Hold Back Invoice from the Job or Customer Explorer and change the Invoice Description and enter text into the Memo field.
Continue on to the next page to view an example of a Hold Back Invoice created by the Job Closing process.
FRM 10073
Previous Page Page 3 of 4 Next Page