Inventory Issues & Returns Return Parts From a Job
Return Parts from a Job (continued)
1. Navigate to the Main Application Menu and select the Issues/Returns option from the Inventory module.
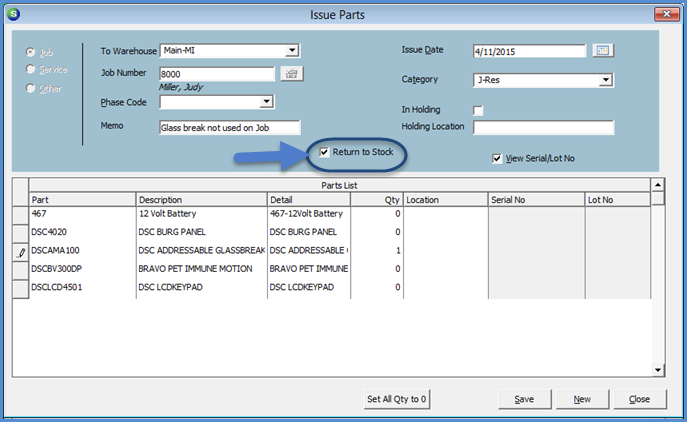
2. The Issue Parts form will be displayed. Fill in the information in the header section of this form; see the data entry field definitions below.
3. Once all information has been entered, click the Save button located at the lower right of the Issue Parts form.
Data Entry Field Definitions
Radio Buttons - Select the Job radio button.
Warehouse - Select the Warehouse from the drop-down list to which the parts are being returned.
Job Number - You may type in the Job Number or click the ![]() lookup button to the right of the field to select from a list of Jobs.
lookup button to the right of the field to select from a list of Jobs.
Memo - You may enter an optional note into this field.
Return to Stock - Check this box.
Issue Date - Enter or select a date from the calendar. This is the date the parts are being returned to the Warehouse. This date must be in an open accounting period.
Category Code - Select the appropriate Category from the drop-down list.
Set All Qty to 0 - If all parts are not being returned, click this button to zero out the quantity of all parts listed in the grid.
Parts List - The Parts List will automatically fill in with all parts previously issued from the selected warehouse. If all parts listed are being returned to the warehouse, click the Save button and all parts previously issued to the job will be returned to the selected Warehouse. If a partial return is being performed, modify the quantities displayed on the parts list. Only parts with a quantity greater than zero will be returned to the warehouse.

7310-1
Previous Page Page 2 of 2