Accounts Payable Vendors Inactivating a Vendor Record
Once a Vendor record has been created, it may inactivated at any time. If there have been any transactions performed for the Vendor, these will remain in the database permanently. Follow the instructions below to Inactivate a Vendor.
1. To inactivate a Vendor it must be accessed in edit mode by using one of two methods:
a. Navigate to the Main Application Menu and select Accounts Payable/Vendors. From the Vendor list, highlight the Vendor to be inactivated, then press the Edit button located at the lower right.
b. Navigate to the Main Application Menu and select Accounts Payable/Vendors. From the Vendor list, double-click on the Vendor to be inactivated. Once the Vendor Explorer record is displayed, highlight the Vendor Information tree option, right-click and select Edit Vendor.
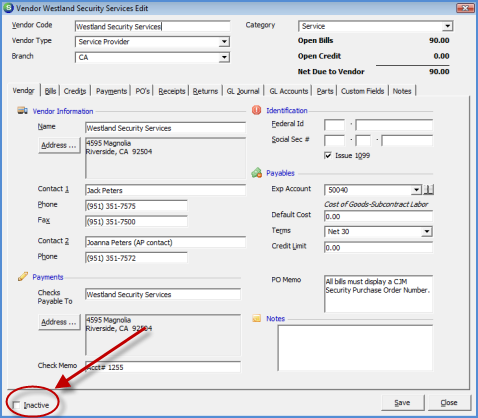
2. Once the Vendor is displayed in edit mode, select the Inactive checkbox located a the lower left of the Vendor Edit form. Press the Save button when finished.
![]() Prior to
inactivating the Vendor, the User may want to enter a Vendor Note
explaining why the Vendor is being inactivated.
Prior to
inactivating the Vendor, the User may want to enter a Vendor Note
explaining why the Vendor is being inactivated.

ss6032