Repair Order (continued)
Data Entry Field Definitions
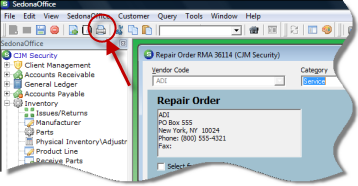
Vendor - Select the Vendor from the drop-down list to whom the parts are being sent for repair.
Category - Select the appropriate Category Code from the drop-down list.
Warehouse - Select the Warehouse from the drop-down list.
Repair Number - This field will automatically fill in with the next regular Purchase Order number; typically this field is used to enter the return authorization number provided by the Vendor.
Order Date - Enter the date the parts are being sent out for repair.
Due Date - If the Vendor has provided a date when the parts will be returned, entered that date; otherwise this field may be skipped.
Parts - In the body of the form select the part or parts
being sent to the Vendor. In the Part Code field, either type in
the exact part number or press the ![]() button in the right of the field to search for and
select the part. Enter the
quantity. If more than one part is being returned, continue
on to the next line and select the next part until all needed parts
are listed.
button in the right of the field to search for and
select the part. Enter the
quantity. If more than one part is being returned, continue
on to the next line and select the next part until all needed parts
are listed.
Memo - The User may type in a note with information related to the repair (see example on the previous page screen shot).
4. Once all information is filled into the form, press the Save button located at the lower right of the Repair Order form.
5. Print the Repair Order - If it is desired to print a copy of the Repair Order to use as a packing list, return to the Repair Order List; double-click on the desired Repair Order to open the form. Once the Repair Order form is open, press the Printer icon located on the Main Function Button toolbar; the report will be sent to the workstation default Purchase Order printer.
ss7602